Set Up IAPHUB in Your Adalo App
Introduction
Adalo is an amazing platform to design and build custom Android & iOS apps with no code required.
We're proud to support Adalo. This guide will walk you through the different steps to install IAPHUB and sell in-app purchases on your Adalo app.
Our friends at Adalo made a great tutorial video explaining the basic steps to install IAPHUB on an Adalo app.
You should first install IAPHUB from the Adalo marketplace. After doing so, you'll be able to use the following components:
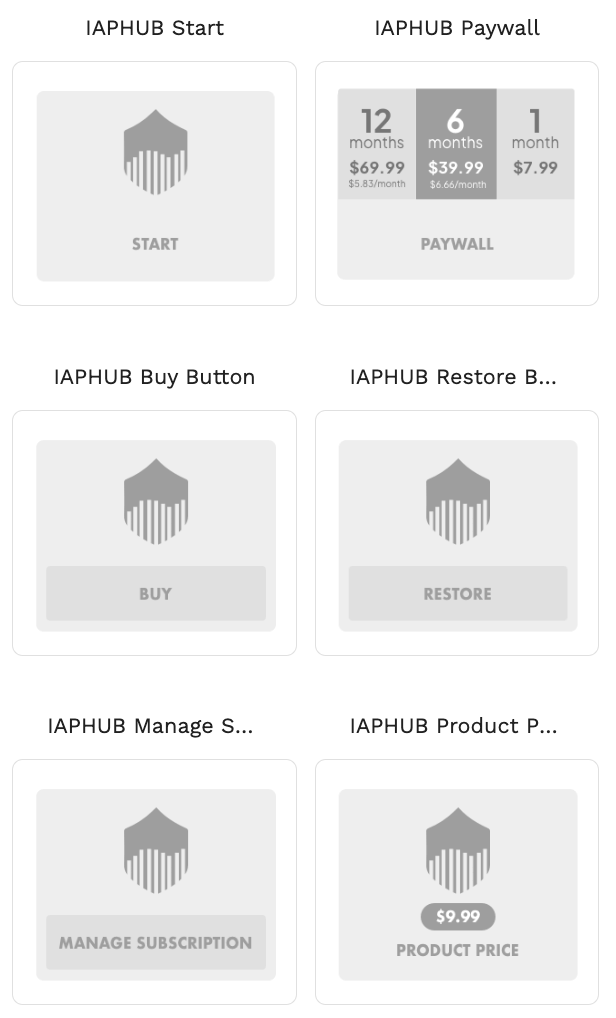
IAPHUB Start
The IAPHUB Start component will display an activity indicator and is required to initialize IAPHUB and load your products.
IAPHUB Paywall
The IAPHUB Paywall component will display all the UI necessary to sell your auto-renewable subscriptions.
This component supports one or multiple subscriptions belonging to the same subscription group. It is extremely easy to set up and will load the subscriptions directly from IAPHUB, allowing you to configure your subscriptions directly from the IAPHUB dashboard.
IAPHUB Buy Button
The IAPHUB Buy Button component is necessary when developing a custom paywall.
This button will initiate a purchase when the user clicks on it.
IAPHUB Restore Button
The IAPHUB Restore Button component is necessary when developing a custom paywall.
This button will restore the purchases of the user when clicked.
IAPHUB Manage Subscription Button
The IAPHUB Manage Subscription Button component is necessary when developing a custom paywall.
This button will redirect the user to the Google/Apple page to manage their subscription when clicked.
IAPHUB Product Price
The IAPHUB Product Price component is necessary when developing a custom paywall.
This component will display the price of the product you've configured.
Create app
If you have not created an IAPHUB account yet, you can easily do so here. It will only take a few seconds.
After doing so, log in to your account and create an app. That's it for now; we'll configure the app later in this guide.
Set up Start component
The first step is to add the Start component to your app.
You will find detailed instructions here, explaining step by step how to set up the component.
Set up Paywall
Once the Start component is set up properly, it's finally time to add the paywall.
If you're selling subscriptions, we've developed a plug-and-play paywall component that will make your life easier.
You will find detailed instructions here, explaining step by step how to set up the component.
If you're looking to sell consumables or need a custom UI to sell your subscriptions, you'll have to develop a custom paywall using the Buy Button, Restore Button, Manage Subscription Button, and Product Price components.
You will find detailed instructions here.
Create products
After you've successfully implemented the IAPHUB components in your Adalo app, you should create your product(s).
Please follow our guide explaining how to create a product.
Offering a subscription with multiple durations
We recommend starting with something easy, such as a single monthly subscription. However, if you are looking to offer a subscription with multiple durations, you must create multiple subscriptions that belong to the same subscription group.
Please follow our guide explaining how to create a subscription group.
The order of your subscriptions in your App Store Connect subscription group is very important!
It will determine if the subscription replacement is an upgrade, downgrade, or crossgrade.
For example, if you want to sell 1-month, 6-months, and 1-year subscriptions, the recommended order would be:
- 1 - 1-month subscription
- 2 - 6-months subscription
- 3 - 1-year subscription
That way, a user changing from a 6-months subscription to a 1-month subscription will happen immediately (subscription upgrade), and a user changing from a 1-month subscription to a 6-months subscription will happen at the next renewal date (subscription downgrade).
You must create only one subscription group (the Paywall component doesn't support multiple subscription groups).
Create listing
A listing contains the products you have for sale.
Without creating a listing, your users won't see your products (even though you've created them on the Products page).
Please follow our guide explaining how to create a listing.
Set up Android app
After you have installed IAPHUB properly in your app, you should, of course, always test your Android app to make sure everything is working. If you haven't done so already, you should first create and configure your app on the Google Play Store and publish a release in the internal testing track. You can follow this great guide from Adalo explaining everything step by step here.
After you've published your app on the internal testing track, click on the link (on the "Testers" tab of the "Internal testing" page) to join the test. After joining the test, you should now be able to download the app, and it should display the paywall with your products properly (if everything is working fine). If your product isn't displayed, take a look at this guide that will walk you through the different possibilities that could cause this issue.
In order to make a purchase, we're going to need to configure the Google Play API to allow IAPHUB to validate the payment receipts. Follow this guide explaining step by step how to configure the Google Play API.
Don't forget to enter your Android app Bundle ID on the settings page of the IAPHUB dashboard; it should match the one you've entered on Adalo when building the app.
If you're selling subscriptions, we recommend enabling Google server notifications. It will allow IAPHUB to be notified in real time when the status of a subscription is updated. Otherwise, IAPHUB will only refresh the status of a subscription at regular intervals (usually every 24 hours).
You'll also need to add your account for license testing. License testers will be able to purchase your products for free (sandbox purchase). The subscriptions will also renew more quickly than normal to aid in testing.
After you've configured everything, you should try to make a sandbox purchase.
Set up iOS app
After you have installed IAPHUB properly in your app, you should, of course, always test your iOS app to make sure everything is working. If you haven't done it yet, you should first create an app and publish it on TestFlight. You can follow this great guide from Adalo explaining everything step by step here.
After that, check the agreements of your App Store Connect account. You'll have to sign the Paid Applications Agreement and set up your banking and tax information. If everything isn't signed and set up correctly, the App Store Connect will not return any products for sale.
Go to the settings page of the IAPHUB dashboard, enable the iOS platform, enter the Bundle ID (the same one you've entered on Adalo when building your app), and configure the shared secret and the App Store Server API.
If you're selling subscriptions, we recommend enabling iTunes server notifications. It will allow IAPHUB to be notified in real-time when the status of a subscription is updated. Otherwise, IAPHUB will only refresh the status of a subscription at regular intervals (usually every 24 hours).
You can now download the app on TestFlight. Check that your paywall is displaying your products and try to make a purchase. Users on TestFlight will be able to make a purchase for free (sandbox purchase). The subscriptions will also renew more quickly than normal to aid in testing.
If your product isn't displayed, take a look at this guide that will walk you through the different possibilities that could cause this issue.
Before publishing your app
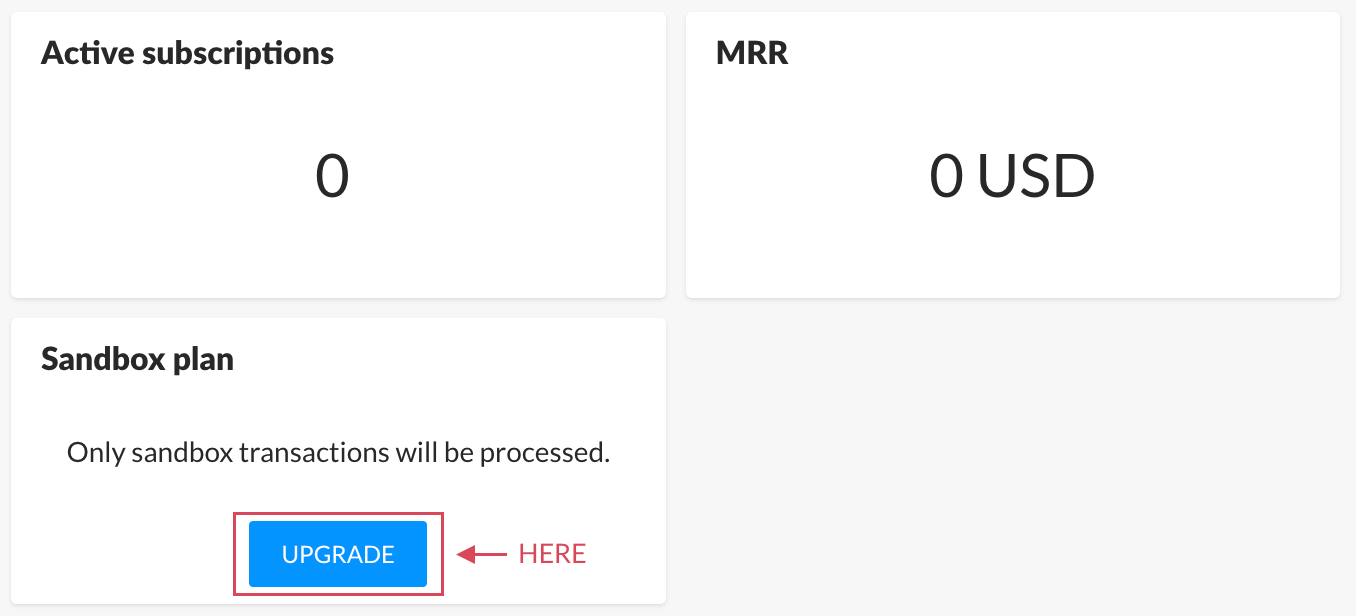
Upgrade your plan to production
Do not forget to upgrade your IAPHUB plan to production on the IAPHUB dashboard (see screenshot below) in order to be able to process real transactions.
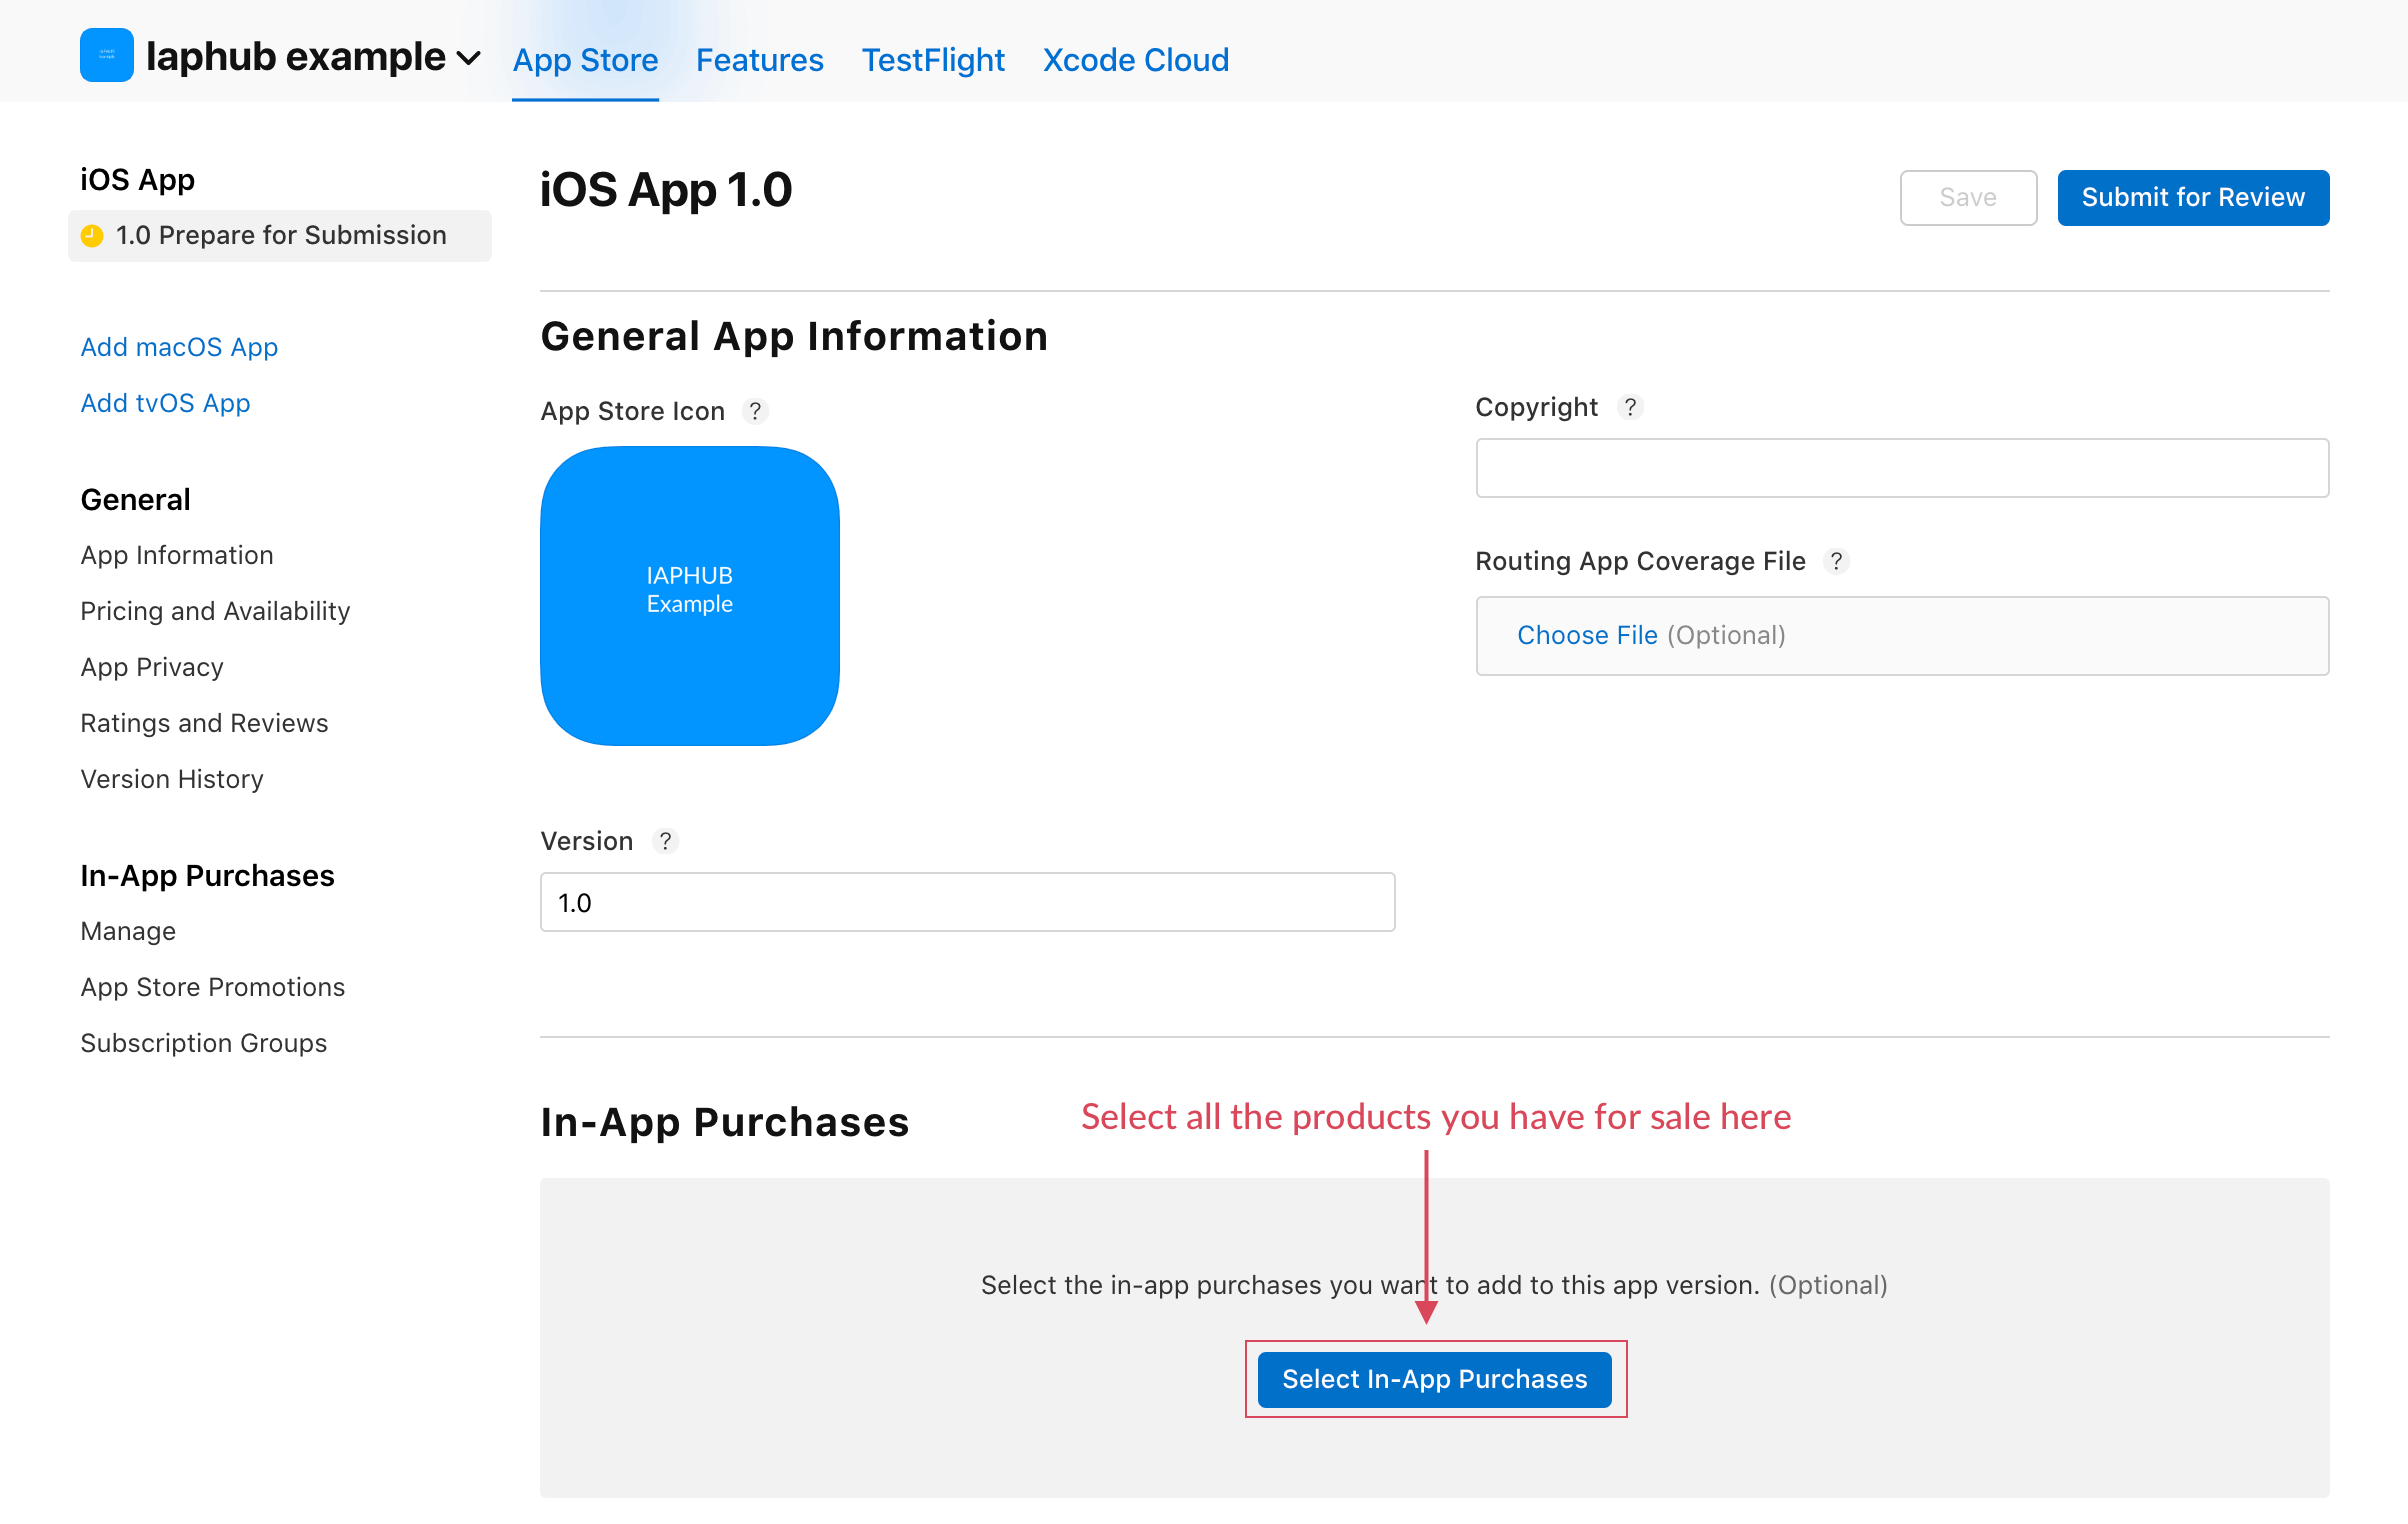
Select in-app purchases on App Store connect
On App Store connect make sure to select your subscriptions before submitting your app for review (see screenshot below).
New in-app purchase products must be selected in the submission when submitting an app version selling in-app purchases for the first time.
Display production data
If you want to display real transactions (instead of sandbox transactions), do not forget to switch the select to production data. It is located in the topbar of IAPHUB dashboard.

Need help?
Our support is available at [email protected].